A kitchen or bathroom faucet that suddenly sprays sideways, pulses, or produces a weak stream often has a simple cause: a clogged aerator. Learning how to clean a faucet aerator can restore normal water flow in a few minutes and help you tell the difference between a minor maintenance task and a faucet that may be nearing replacement.
The aerator is the small screened piece at the tip of most faucets. It mixes air into the water stream, helps reduce splashing, and catches small particles before they leave the spout. Over time, mineral deposits, sediment, and bits of debris can collect in its screen. That buildup is especially common in busy DFW homes, where hard-water minerals can leave visible residue around faucets, showerheads, and fixtures.
Signs Your Faucet Aerator Needs Cleaning
A dirty aerator does not always look dirty from the outside. The clearest sign is a change in the water coming from one faucet while other faucets in the home still flow normally. You may notice lower pressure, an uneven spray, water shooting at an angle, or a stream that separates into several thin lines.
If both the hot and cold sides of that one faucet have weak flow, the aerator is a likely place to start. If only one side has reduced flow, the issue could be inside the faucet, at a shutoff valve, or in the supply line instead. Cleaning the aerator is still a reasonable first step, but it may not solve every pressure problem.
Visible white or greenish crust around the faucet tip is another clue. White buildup is generally mineral scale. Green or blue staining can occur on some metal fixtures as they age. While surface residue does not automatically mean the faucet is failing, it is worth checking the aerator before the buildup gets harder to remove.
What You Need Before You Start
Most homeowners can clean an aerator with a soft cloth, a small bowl, white vinegar, an old toothbrush, and a pair of pliers. A rubber band or cloth placed between the pliers and aerator helps protect the finish from scratches.
Before removing anything, plug the sink drain or cover it with a washcloth. Aerators contain small screens, washers, and flow restrictors that can disappear quickly down an open drain. Taking a quick photo of the aerator before disassembly can also save frustration during reassembly.
Not every faucet has the same type of aerator. A standard aerator usually threads onto the outside of the spout and can often be removed by hand. A recessed, or cache, aerator sits inside the spout and may require a small plastic key designed for that faucet model. Avoid forcing a recessed aerator with metal tools, since that can damage the spout or the hidden threads.
How to Clean a Faucet Aerator Step by Step
Start by turning off the faucet and drying the end of the spout. Try loosening the aerator by hand, turning it counterclockwise when viewed from below. If it is stuck, wrap it with a cloth or rubber band and use pliers gently. Use steady pressure rather than squeezing hard. Too much force can bend the aerator or mar the faucet finish.
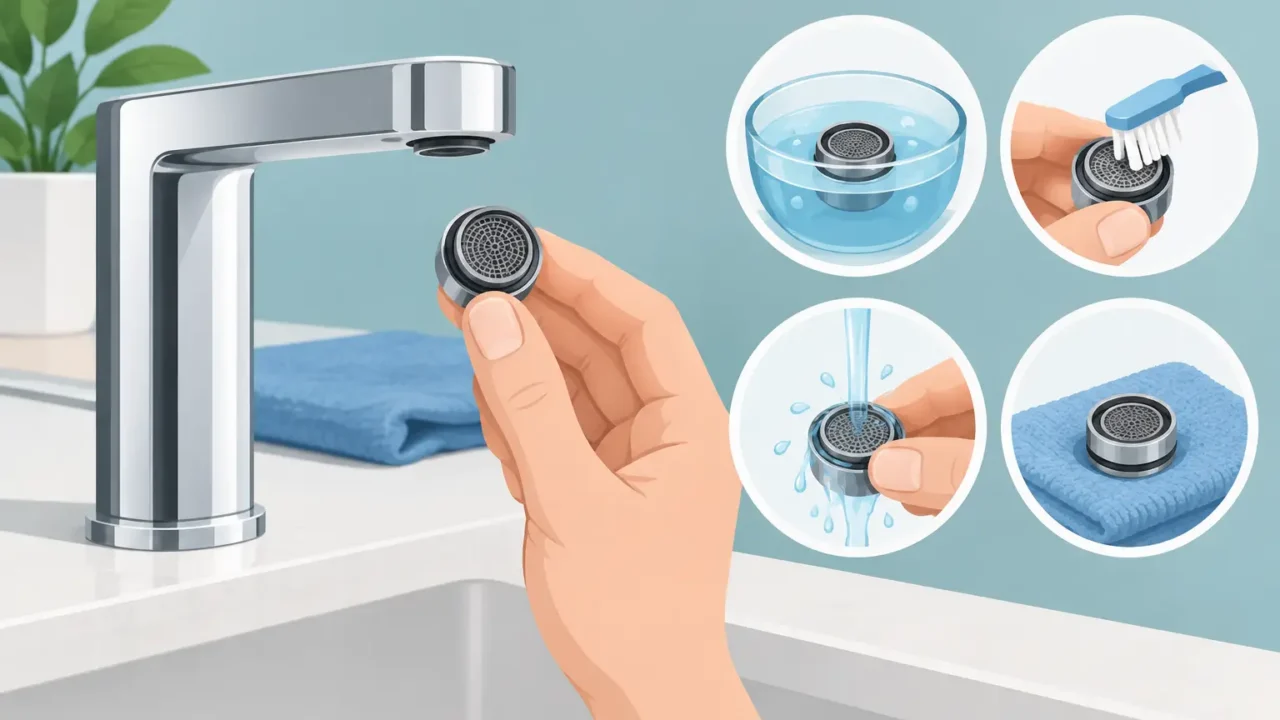
Once it comes off, keep the parts in the order they were removed. Many aerators include an outer housing, a screen, a small plastic insert, and one or more rubber washers. Their order matters. Lay them on a towel in sequence rather than dropping everything into a bowl at once.
Rinse loose debris under water first. Then place the metal screen and other non-rubber parts in a shallow bowl of white vinegar. A soak of 15 to 30 minutes is usually enough for light mineral buildup. Heavy scale may need more time, but avoid leaving delicate plated pieces in vinegar for hours, especially if the finish already looks worn.
After soaking, use an old toothbrush to loosen remaining deposits. Clean the screen holes carefully without enlarging or tearing them. Rinse every part thoroughly with clean water. If sediment is lodged inside the faucet spout, briefly turn the water on with the aerator removed and let it run into the sink for a few seconds. Keep the stream low at first, because trapped debris can come out quickly.
Reassemble the parts in their original order. Thread the aerator back onto the faucet by hand until snug, then test the water flow. If a small leak appears at the connection, tighten it slightly more by hand or use the cloth-covered pliers for a very small adjustment.
When Vinegar Is Not the Best Choice
White vinegar is useful for common mineral scale, but it is not a cure-all. If the screen is torn, the plastic insert is cracked, or a washer has become flattened and brittle, cleaning will not restore the aerator properly. Replacement aerators are inexpensive, but they are not one-size-fits-all. The thread size, flow rate, and style need to match the faucet.
Be careful with specialty finishes such as matte black, brushed gold, or unlacquered brass. Vinegar can damage or discolor some finishes if it contacts the outside of the faucet for too long. When in doubt, remove the aerator and soak only the internal components. Wipe the faucet exterior with a mild soap-and-water solution instead.
A faucet may also have an aerator that is built into a pull-down sprayer head. In that case, the screen or flow restrictor can be located inside the spray head rather than at the tip of the spout. Check the faucet manufacturer’s instructions before taking apart a sprayer, since the internal pieces vary widely.
Why the Aerator Clogs So Often
Mineral accumulation is the most common reason, but it is not the only one. Sediment can enter a faucet after plumbing work, a water heater change, a municipal water interruption, or repairs that disturb debris in the lines. In newer homes, construction debris can occasionally show up at fixture screens as well.
That is why cleaning an aerator is also a useful diagnostic step. If you find a little white scale, routine maintenance may be all you need. If you find repeated grit, dark flakes, or larger particles shortly after cleaning, pay attention to the pattern. The source may be elsewhere in the plumbing system, and repeated aerator cleaning alone will not address it.
When a Clogged Aerator Is Not the Real Problem
If cleaning the aerator does not improve the flow, do not keep tightening or taking apart the faucet at random. A worn cartridge, partially closed shutoff valve, kinked supply line, or internal corrosion can create similar symptoms. Dripping at the base of the spout, difficulty moving the handle, or water collecting under the sink are also signs that the issue may extend beyond the aerator.
Age matters, too. An older faucet with a deteriorating finish, recurring leaks, and inconsistent flow may be more practical to replace than to repair piece by piece. Homeowners who have already chosen a new fixture can schedule professional faucet replacement rather than trying to adapt parts that no longer fit or perform well.
For a replacement, confirm the new faucet matches your sink configuration before installation. Count the mounting holes, check whether the faucet includes a deck plate, and make sure the spout height works with nearby cabinets or windows. Those few checks can prevent an otherwise simple project from turning into an unexpected return trip to the store.
A Small Maintenance Habit That Helps
Cleaning a faucet aerator once or twice a year is usually enough for many homes. You may need to do it more often if your water leaves noticeable mineral residue, if the faucet sees heavy daily use, or after work has been done on nearby water lines.
A clean cloth around the faucet tip during regular sink cleaning helps prevent mineral deposits from hardening on the outside. More importantly, pay attention when the water stream changes. Taking care of a small screen early is easier than living with poor flow for months or assuming the entire faucet has failed.
For homeowners in Hurst, Euless, Bedford, Grapevine, and nearby DFW communities, Direct Home Pros can help when a faucet has moved beyond a simple cleaning and a properly installed replacement makes more sense. A well-functioning faucet should deliver a clean, steady stream without leaks, surprises, or extra hassle.